Tuesday, July 28, 2015

AnkiDroid 2 へ移植

はじめに

(AnkiDroid v2.0.1リリース時に一部追加、修正 2013-02-09)
AnkiDroid2.0へバージョンアップして、大幅に改善された新しい機能を使用するためには、AnkiDroid1.xの単語帳のフォーマットの変換が必要になります
AnkiDroid1.xの他に、パソコンでAnki(AnkiDesktop)を使用している場合や、AnkiWebを使用している場合には、それぞれver2.0以降のものにバージョンアップする必要があります。 パソコン用のAnkiDesktopのバージョンアップ情報はこちらを参照. 新しいWebはこちらを参照。
注)Anki(AnkiDesktop)はパソコンにインストールして使用するソフトで、単語帳の作成やカスタマイズの他、仮想サーバ(web server)を経由してアンドロイド端末(スマホ用AnkiDroid)やiPhone(AnkiMobile)と、単語帳のデータを共有(一元管理) することができます。
Anki2(AnkiDesktop2.0)も大幅に機能が改善され、単語帳の作成、カスタマイズ機能なども多数追加されています。新しい単語帳の機能を使用すれば、AnkiDroid2.0での学習スタイルに根本的な変化をもたらします。ぜひ、こちらを参考にしてください。

単語帳をアップグレード

新しいAnki2形式に単語帳をアップグレードするには、主に2つの方法があります。詳細は下の手順を見てください。次に進む前に、AnkiDroidの最新バージョンを使用していることを確認して下さい(現在は、v2.0.1)
いずれの方法も、古い単語帳はアンドロイド端末に残りますので、失敗した場合にはあわてずに、別の方法でアップグレードしてください。
第1の方法(推奨の方法):既にWebサーバー経由でAnkiDroid1.xと、パソコン上のAnki1.x(AnkiDesktop1.x)を 使って単語帳を同期させている場合はこの方法が簡単なので、お勧めします。 パソコンと同期させて、単語帳をAnki1.xへ保管した後、Anki2.0(AnkiDesktop2.0)をインストールして、同時に単語帳を新しい フォーマットへ変換します。その後、Webサーバー経由で新しい単語帳をAnkiDroid2.0へ同期させるか、USB経由でアンドロイド端末へコピー します。 Anki1.x(AnkiDesktop1.x)を使用していない場合には、Anki2.0(AnkiDesktop2.0)をインストールした後に転送 する方法(Step by Step)を、参照してください。
第2の方法は、AnkiDroidからWebサーバーに単語帳ををアップロードして、自動的に新しい単語帳に変換した後、 AnkiDroidへダウンロードする方法です。しかし、メディアファイル名の重複に対応できない事と、単語帳の合計サイズ(圧縮後のサイズが50MB以 下)にも限界があるため、この方法は推奨できません。もし、パソコン上のAnkiDesktopを使用したことがない場合などは、単語帳のサイズはとても 小さいく、メディア(画像や音声ファイル)も使用していないと思われますので、この方法が一番簡単かもしれません。しかし、パソコンを使い AnkiDroid2.0を使用できる環境にある場合は、「第1の方法」でアップグレードを実施してください。

方法1:パソコンソフトAnki2.0(AnkiDesktop2.0)を使用する方法(推奨)

オプション1:USB接続を使用(推奨)

  1. 既にAnki Desktop v1.xがインストールされているならば、アンドロイド端末の /mnt/sdcard/AnkiDroidフォルダから、全ての単語帳ファイル(*.anki)をパソコンの「マイドキュメント」のAnki 1 フォルダにコピーします。
  2. メディアファイルを使う場合、アンドロイド端末の /mnt/sdcard/AnkiDroidフォルダから、全てのメディアフォルダー(単語帳の名前.media)をパソコンの「マイドキュメント」のAnkiフォルダにコピーします
  3. 念のためデータをチェックしておきます(Anki1.xを起動して、「ツール」> 「メンテナンス」>「データベースをチェック」)
  4. 最新バージョンのAnki2.xをインストールしてください http://ankisrs.net
  5. Anki2.xを実行し、指示に従って単語帳をアップグレードしてください(自動的に単語帳が変換されない場合には「Step by step」を参照してください)
  6. 全てのアップグレードされた単語帳をエクスポートします (Anki2.xから「ファイル」>「書き出す」)
  7. 設定を変更せずに「書き出す」ボタンをクリックします。
  8. ファイル名と保存先を選択するように求められます。"collection.apkg"などの名前を付けて、デスクトップなどに保存します。
  9. この"collection.apkg"をアンドロイド端末の/mnt/sdcard、にコピーしてください
  10. AnkiDroid2.xをインストールします(Google Playまたは APKから)
  11. AnkiDroid2.xを開きます
  12. 画面には、変更の一覧が表示されますので、続行します。
  13. アップグレードの手順が表示されます。
  14. PCとUSBを使ったアップグレードを選択してください。
  15. AnkiDroid2.xのMENU画面から "インポート"(読み込み)を選択してください
  16. 単語帳(コレクション)のインポートが完了します ### オプション2:既にAnkiWebとの同期を利用している場合: この方法は提供停止です。

方法2:AnkiWebを使ってアップグレード(PCなしでのアップグレード)

この方法は提供停止です。

なにか操作を間違えた場合などの処置

安心してください。AnkiDroid2をインストールしても、古い単語帳は削除されません。古い単語帳はAnkiDroidフォルダ内に残ってい ます。 まず、パソコン上にそれらのファイルのバックアップのためのコピーを作成してください。 アップグレードは何度でも実行できます。AnkiDroid のメニュー画面の"Restart upgrade process"を選択すれば、アップグレードが再起動します。 単語帳が正常にアップグレードされても、メディアファイル(音声、画像etc)が正常に動作しない場合は、アップグレード方法1のオプション1を繰り返し てください。あるいは、手動で個々「単語帳の名前.media」フォルダから、新しく作成された「collection.media」フォルダへ、 それらをすべてコピーしてください。その場合は、ファイル名に競合がないことが必要です。(AnkiDroid2.0では音声ファイル、画像ファイルは、 すべて「collection.media」フォルダの一箇所に保管して利用することになりますので、同じファイル名は使えなくなります)

Step by Step

上記のアップグレードマニュアルに従ってアップグレードしても、問題がある場合には、以下の「ステップバイステップ」の手順に従ってください。その前に、AnkiDroidの最新バージョンがインストールされていることを確認してください!
このガイドでは、Windowsパソコンユーザを前提にしています。 15-60分の作業時間です。アンキ/ Ankidroid /パソコンに精通しているものとして解説します。 このガイドに従った後でも問題が発生した場合は、新しいスレッドを作成するのではなく、ここに投稿してください。

パートA:古いAnkiDroidファイルをPCにコピーする(バックアップする)

  1. USBケーブルでPCに携帯(デバイス)を接続します
  2. パソコンのファイルエクスプローラを開き、あなたのAndroid携帯のフォルダーをを開きます
  3. 携帯のフォルダの中に "AnkiDroid"というフォルダが存在するはずです
  4. この "AnkiDroid"フォルダをすべてパソコンの任意の場所にコピーします(デスクトップなどへコピーしておく)

パートB:Ankiデスクトップソフトウェアを使用して古いデッキをアップグレードします。

  1. http://ankisrs.net/anki2.html(アンキ-2.0.4.exe)から最新アンキ・デスクトップ・ソフトウェアをパソコンにインストールします
  2. インストールしたAnkiのデスクトップソフトウェアを開きます
  3. このAnkiのデスクトップソフトウェアで、「ファイル」 - >「読み込む」
  4. 「ファイルの種類」を(> "Anki 1.2(*.anki) *.anki を保管した場所を開いて、*.anki ファイルを選択してください
  5. AnkiDroidフォルダ内の他の*.anki ファイルにも同じことを行います
  6. エラーが発生した場合こちらを参照してください
  7. あなたのデッキのすべてがAnkiデスクトップソフトウェアに表示されていることを確認してください

パートC:アップグレードデッキをお使いのデバイスに戻す(コピーする)

  1. パソコン上のアンキDesktopソフトウェアの[ファイル] - > [書き出す]、Anki単語帳パッケージ(*.akpg)。対象:全ての単語帳を選択して、"書き出し"ボタンをクリック
  2. この操作で "collection.apgk"ファイルがデスクトップに保存されているはずです
  3. 次にデスクトップフォルダーから、"collection.apgk"ファイルを携帯へ「コピー」します。コピーする方法はいくつかありますが、ここでは右クリックから「コピー」を選択し、ステップ6) で「貼り付け」します
  4. Windowsエクスプローラでもう一度あなたの携帯のフォルダを開く
  5. AnkiDroidフォルダに移動
  6. 右クリックから[貼り付け]を選ぶと "collection.apgk"ファイルがコピーされます(貼り付きます)
  7. ここで、携帯のAnkiDroidを起動し、メニュー画面から"カードのインポート"を選択して指示に従い。「OK」をタップしてください
すべての単語帳がインポートされ、表示されるはずです。

パートD:アンドロイド端末から全てのメディア(音声ファイル、画像ファイル)を "collection.media"フォルダに移動します

メディアを使用しない場合は、その必要はありません
  1. Windowsエクスプローラで、アンドロイド端末上AnkiDroidフォルダを開く
  2. "collection.media"と 、いくつかの"単語帳名.media"と名づけられたフォルダがあることを確認します
  3. 最初の "単語帳名.media"フォルダを開き、
  4. すべてのファイルを選択します(ショートカットキーは、「Ctrl+A」です)
  5. 右クリックから、「コピー」を選択
  6. 戻って"collection.media"フォルダを開き
  7. 右クリックから、「貼り付け」を選択
  8. 全てのファイルの移動が完了するまで待ちます
  9. 他の "単語帳名.media"フォルダでも、手順4〜8を繰り返します
  10. すべてのメディアファイルが "collection.media"フォルダに移動したことを確認します
  11. オプション: "単語帳名.media"フォルダは、AnkiDroid2.0では使用しませんので、ファイルを移動した後は空の"単語帳名.media"フォルダは削除しても構いません。
注:この方法では、同じ名前のメディアファイルを扱うことができません。そのような状況では、方法1、オプション1に従うことが必要です。または、 ファイル名を変更して保管して、単語帳側での使用ファイル名を修正する方法もあります。 いずれの方法でも、メディアファイルは必ずバックアップをとってから実施してください。

旧のAnkiDroid1.xを使用し続ける方法

パソコンが使用できない場合には、とりあえず古いAnkiDroid1.0を使うことができます。
次のリンクからのAnkiDroid 1.1.3パラレルバージョンをインストールしてください。AnkiDroid2と共にAnkiDroid1.1.3を使用し続けることができます。こちらをインストールしてください。AnkiDroid2と共にAnkiDroid1.1.3を使用し続けることができます。 ただし、申し訳ありませんが、AnkiDroid1.xは、バグ修正とはサポートされなくなります。 また、古いバージョンのAnkiDroid1.xでは同期機能も使用できませんので、ご注意ください。(古いAnkiWeb1サイトは既に利用できなくなりました)
新しいAnkiDroid2の使い方を覚えるのに、多少の時間を必要とするかもしれませんが、ぜひ新しい機能を満載したAnkiDroid2をお使いください。 さまざまな学習機能や、単語帳の作成、効率的な単語帳の管理、カードの管理は学習効率を高めるものです。

Wednesday, October 9, 2013

海外へソフトウェアを売る:海外のお客様にとって便利かつ、手数料が少ない支払い方法?

イージフはCmisSyncという120USドルのソフトウェアを海外に売って初めたら、支払いの選択を検討しました。完璧な方法がないので、選択肢を下記に説明します。


銀行振込

銀行振込は海外のお客様にとって一番不便な選択肢です。

ヨーロッパ人はヨーロッパ内へ振込をするとき、IBAN("国際講座番号")という便利なシステムに慣れていて、金額と相手の番号だけ入れたら終了です。米国だとRTNという似てるシステムがあります。IBANは最近アジア、アフリカと中米に普及していますが、残念ながらまだ全世界ではありません。
特に、日本ではSWIFTコードという古い仕組みしかなく、IBANはまだ使用できません。

海外のお客様にとっての不便なポイント:
1.カザフスタンへ振込は30秒で終わりますが、銀行員は日本への振込経験がなく、振込をするのは難しいです。私が銀行で手続きした際は、銀行員が混乱してしまい、色々な資料を書かされました。
2.外国人は、日本の名前と住所を書くのは苦手です。文字を書き間違えることが多く、振込がうまく行きません。8つの情報も必要です:受取人取引銀行名、受取人取引支店名、受取人口座名義、会社住所など、銀行支店住所まで必要とします。一般の欧米人にとっては、これはありえません。

逆に、弊社にとっては一番楽な方法です:銀行口座を持ってるだけでできます。ただし、書き間違いの際に、サポートの手間が掛かります。

銀行振り込みの手数料は、固定の部分が大きいので、120USドルの場合は不利です。
送金手数料、海外電信手数料、為替取扱手数料など掛かります。お客様側の手数料もあり、弊社側の手数料もあります。

結論:
金額が大きい場合、もしくは一回のみの場合には、便利です。
120USドルの商品を大量に売りたい場合は、お勧めしません。手間が掛かり、買わないお客様もいます。

VisaやMasterCardクレジットカード

海外のお客様にとって一番便利な方法です。
ソフトウェアをインターネットで買うと、クレジットカードの番号を聞かれます。

VisaとMasterCardと銀嶺カード(China UnionPay)だけで、世界の大部が対応できます。
しかし、この3社と契約を結ぶ必要もあり、支払いの為のウェブページを作る必要もあり、手間が掛かります。手数料も掛かります。

クレジットカード会社の上に、まとめてサービスを提供してる会社もあります。もちろん、手数料が更に掛かります。
例えば、イプシロンという会社がVisa、MasterCard、Diners、American Express、JCBを扱っていていますが、手数料は約8%掛かります。

結論:
手数料は高いですが、たくさん売る場合は必要な方法になります。

ペイパル

会社にとっても、お客様にとっても、比較的に簡単な方法です。

振込やクレジットカードと違って、手数料は弊社が払います。
手数料が銀行振込より低いです:基本は3.9% + $0.30 USドルです。

例:
・取引手数料:ドル取引の場合3.9%+0.3USドル
・換算レート:本日のTTM96.94円に対して94.8円
・出金手数料:5万円未満の場合250円
なので、一回ずつなら6%+0.3USドルぐらいになります。

ペイパル法人アカウントを作るのは難しいくありませんが、
・ 色々な資料を送る必要があります。
・手続きは、取締役か代理人がを行えます。
・テスト振込と郵便で確認されます。
・およそ一週間ほど掛かります。

Bitcoin

大幅に、手数料が低い方法です:0.06% (銀行振り込みはその100倍ぐらい)

bitcoinをもらったら、そのまま保存するか、簡単に日本円に変換もできます。
MT.GOXという世界一大きいBitcoin取引所は東京の渋谷にあります。

しかし、 Bitcoinを使うお客様が少ないです。特に、企業ではほとんど使用されていません。
弊社にとっては、設定はクレジットカードより簡単です。

結論

銀行振り込みとペイパルで始めて、売上が上がりそうの場合はクレジットカード、という戦略をお勧めします。
他の方法やアイディアがあれば、ぜひ nicolas.raoul@aegif.jp へご連絡ください!(日本語の対応も可能です)
Nicolas Raoul

Tuesday, June 25, 2013

明日Hills Breakfastを司会します

明日6月25日、Hills Breakfastを司会します。
スライド20枚、1スライド20秒、というTEDよりダイナミックな形式の毎月行わるプレゼンテーションイベントです。
私は2010年に発表者として出てから、毎月スライドとPCを操作する役をやってますが、今回は初めての司会。是非観に来てください!

明日も非常に面白そうなプレゼンターが出ます:
  • 中島佳織さんはフェアトレード・ラベル・ジャパンの事務局長としての活動を発表して、
  • トライフ代表取締役手島大輔さんは日本の高齢者の毎日の課題について興味深い話をして、
  • ディジティ・ミニミ代表取締役竹中直純さんはウェブ会社の戦略を明らかにします。
  • 最後に、プロバスケチーム“東京エクセレンス”GM辻秀一さんが皆にスポーツのやる気を入れる予定です!
ニコラ・ラウル

I will perform as the host for Hills Breakfast tomorrow (June 25).
Hills Breakfast is a monthly presentations event, based on the PechaKucha format, 20 slides x 20 seconds, which is faster and more lively than TED's 18 minutes.
I started as a presenter in 2010 and since then I usually operate the PC/projection, but tomorrow will be my first time as MC. Looking forward to see you there!

Tomorrow promises to be very entertaining with:
  • Kaori Nakajima talking about her work at the head of Fairtrade Japan.
  • Paris-based Swedish artist Per Hüttner will bring us in the universe of the OuUnPo project.
  • Daisuke Teshima will enlighten us about the daily problems of the Japanese senior citizens.
  • Naosumi Takenaka will detail his strategies as the founder of a web agency.
  • Finally,  Shuichi Tsuji is sure to passionate the crowd with his speech as the manager of the pro basketball team Tokyo Excellence.
Nicolas Raoul

Friday, May 24, 2013

Bye Google Reader, hello Feedindicator!

In one month, Google Reader will shut down.
Luckily, Ubuntu users can use Feedindicator:

Features

  • Click a news and it will appear in your browser.
  • Icon turns grey when there are no more news.
  • Easily mark all as read.
  • Option to show each feed in its own sub-menu.

Adding a feed

To add a feed, just click "Add feed" and enter the RSS/Atom URL:


Migrating from Google Reader to Feedindicator

From Google Reader, click the gear, select Reader Settings > Import/Export > Export your subscriptions.This will download subscriptions.xml

Download google-reader-to-feedindicator.sh, make it executable, and execute it in the same directory as subscriptions.xml ...Feedindicator should now show your feeds!

Details

Feedindicator stores all feeds as a simple text file at ~/.config/feedindicator/feeds.cfg
One line per feed, for instance:

http://www.w3.org/News/atom.xml
http://www.tradecommissioner.gc.ca/rss/ForeignEvents_RSS.xml


Feedindicator is Open Source, I maintain it, waiting for your feedback!
Nicolas Raoul

Wednesday, May 22, 2013

How to synchronize SharePoint to a Mac? (alternative to SkyDrive Pro client)

SharePoint users can synchronize their documents with the SkyDrive Pro client (not to be confused with SkyDrive).

Unfortunately, the SkyDrive Pro client is not available on Mac (and Linux), and even if you are on Windows, in addition you must pay for Office 2013 Professional Plus before using it.
Microsoft shows no sign of clemence towards Mac users on this matter.
Using Parallels does not help: My Documents is then seen as a network location, which means that Skydrive Pro fails to save documents there.

But here is new hope!
CmisSync allows you to sync SharePoint to your desktop, no license fees, and Mac/Linux versions are planned.

CmisSync is currently Windows-only, but it is Open Source and looking for volunteers to port the code. CmisSync is built with Mono, which means it should be easy to port it to Mac/Linux/Android/iOS. So please developers plunge forward and don't hesitate to ask us questions :-)

Wednesday, April 10, 2013

CMIS: What are Secondary object types?

The main advantage of ECM servers over file servers is the ability to have metadata about the documents, and the ability to define what metadata should exist, on what kind of document.

For instance, an ECM administrator might decide that pictures should have a height and a width metadata, while bills should have a price metadata. In CMIS parlance, pictures and bills are called "primary types".

Most ECM servers also have a "secondary type" concept. Secondary types are more transverse, and can be applied to documents of any primary type. For instance, "Confidentiality" can be applied to images as well as bills. A document can only have one primary type, but can have several secondary types.
A few examples: Versionability, effectivity, geographic details, audio details, ...

Forgotten in CMIS 1.0, secondary types are now part of the CMIS 1.1 standard, which should be official soon.

Example with Alfresco

In Alfresco, a secondary type is called an "aspect". You can easily add aspects to any document. There are predefined aspects, but you can also define custom aspects.

For instance, let's say we manage field observation reports, and each observation report has a latitude and longitude. So, let's add the predefined "Geographic" secondary type to a document. In the document's details page, click on "Manage Aspects":


 Then add the "Geographic" aspect:


The latitude and longitude are now part of the document's metadata properties:


Looks nice in the Alfresco client, but how is it via CMIS?

The CMIS 1.1 standard is not official yet, so unfortunately in Alfresco 4.2.0, secondary type properties can not yet be seen in the CMIS properties:


Instead, you have to get them via the CMIS extensions, which is a mechanism for vendor-specific tricks:


Actually, there is an open source Java library that makes it easy to retrieve them from there. But I would suggest waiting for CMIS 1.1, you will then be able to use secondary type properties easily, in a way that will work on all ECM servers.

Nicolas Raoul

Thursday, April 4, 2013

How to get the HTTPS headers?

Long-time sniffers remember tracking HTTP headers down the wire using Ethereal (now Wireshark), but this has become impossible in environments where everything is encrypted (HTTPS).

In such environments, tracking headers means monitoring either directly within the server process (difficult in clouds), or within the client process (typically a browser).

Recently I had to reverse-engineer the convoluted authentication to the CMIS endpoint of a Sharepoint server. Below is my tale, and the tools I tried (spoiler: only the last one did the job).

Contestant 1: Chrome Developer Tools

In Chrome, I start Incognito mode (CTRL-SHIFT-N) to make sure no saved passwords/cookies interfere, fire up the Developer Tools (CTRL-SHIFT-I), select "Network" to see the requests, and launch the request.

As seen in the screenshot below, Chrome shows the conversation between client and server. Something sounds fishy: Only 2 requests, and the last one is marked as "canceled" even though download succeded... let's try another tool!


Contestant 2: Firefox Web Console

In Firefox, I start Private Browsing mode (CTRL-SHIFT-P), fire up the Web Console (CTRL-SHIFT-K), unselect everything but "Net", and launch the request.

Firefox wins over Chrome by showing the right number of requests (four):


Now to the job: Getting the HTTPS headers!
I click on a request, and something awful happens: a totally unusable window appears, displaying what I need (request headers and response headers), but preventing me from copy-pasting it.

Mouse selection goes crazy, and copying everything results in an unusable long string containing everything aggregated without spaces [1]. Not to mention the inexact timestamp [2], the content that does not scale with the window [3], and the weird titles font style [4].


Fine if you just want to see the headers, but real hackers want to script-parse and diff the headers, right? Next!


Winner: Httpfox

In Firefox, after having installed the Httpfox extension, I start Private Browsing, fire up Httpfox (SHIFT-F2), press "Start", and launch the request.
The lower part shows the headers, and copying them is accessible via the context menu... perfect!


Conclusion: Httpfox is the easiest way to get HTTPS headers.
If you know any other convenient tool, please let us know in the comments!
Nicolas Raoul

Friday, March 22, 2013

What is the best open source Java decompiler?

A Java decompiler turns a .class file back into a .java file. While decompiled code is not perfect (no comments, sometimes obfuscated names), it can be useful during hacking competitions, or to liberate your data locked by proprietary software, or to satisfy curiosity.

There used to be a time where everyone's decompiler of choice was jad.
But jad is dead, and it was not Open Source anyway, so there must be something better, right?

Current winner

Jdec is the best Open Source decompiler I have found so far.
It is not perfect though: There is no community, and there are bugs, none of which has got fixed since 2007. Also, its website looks very unprofessional.

Challengers

  • JReversePro shows signs of activity but has had no release since 2002
  • JODE has had no release since 2004
  • dcompiler has had no release since 2002

Need work

  • Dava seems to be a thesis project rather than a programming tool.
  • javap only shows assembly-level code
  • Soot is not really a decompiler

Out of Competition

Those ones might be usable but they are not Open Source:
  • Fernflower is not maintained and not open source. Its author Stiver told me "Unfortunately I can't release it under GPL right now, because there are still some legal questions to be solved. However if you are representing a well established company or an R&D institute, an exception would be possible."
  • Java Decompiler (JD) is not open source
  • DJ Java Decompiler is not open source
  • Cavaj is not open source
Please let us know about any other Open Source decompiler your know!
Nicolas Raoul

Wednesday, February 20, 2013

CmisSync:AlfrescoのためのDropboxのような同期ツール

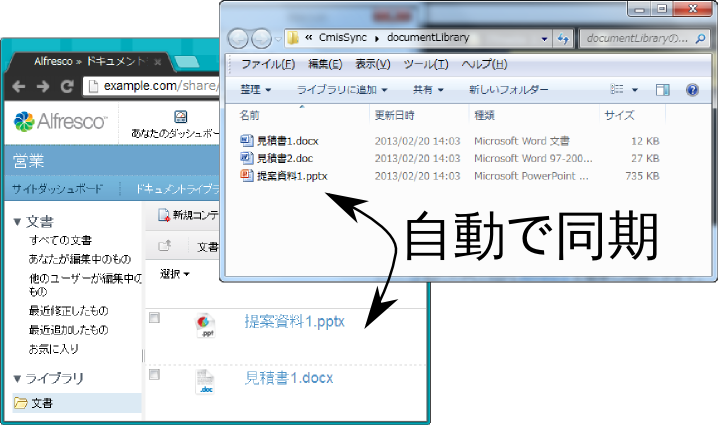
CmisSync を使うと、あなたのPCと社内 Alfresco を簡単に同期できます。
オフラインでも、ドキュメントの閲覧と編集を行えます。


ステップ1

まず .NET Framework、次に CmisSync をインストールしましょう。

ステップ2

CmisSync を実行してください。
チュートリアル画面が終わると、タスクトレイに CmisSync のアイコンが追加されます。


アイコンを右クリックして、「リモートフォルダを追加...」を選択します。

ステップ3

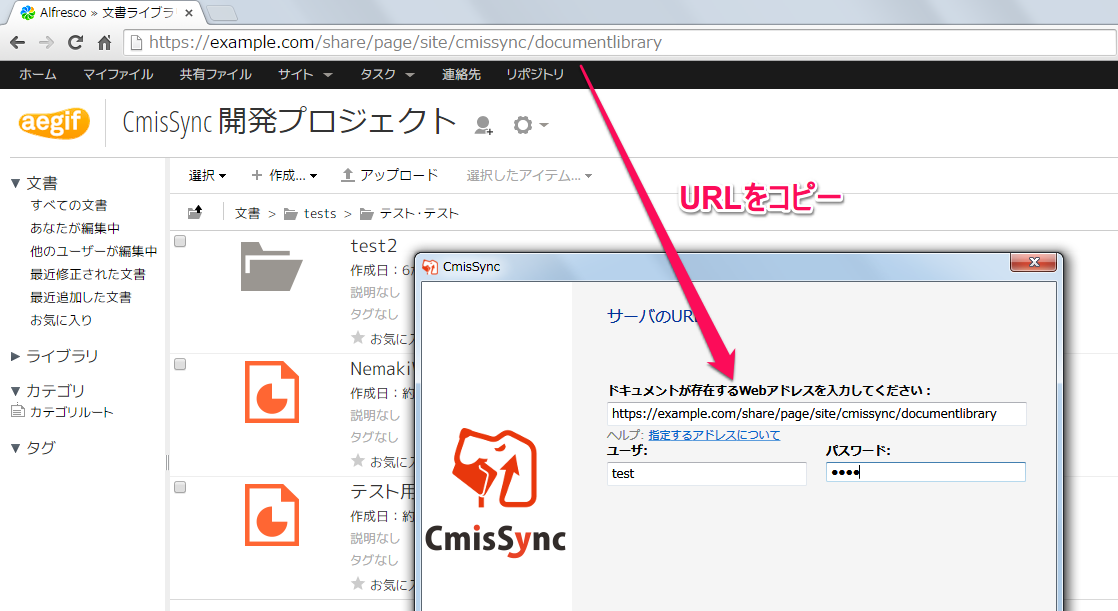
表示された画面の「URL」フィールドに、Alfresco サーバの URL を入力します(ブラウザで Alfresco のドキュメントを閲覧する為のURL):


プロトコル( http:// か https:// )も必要です。
ユーザ名とパスワードも入力してください。

ステップ4

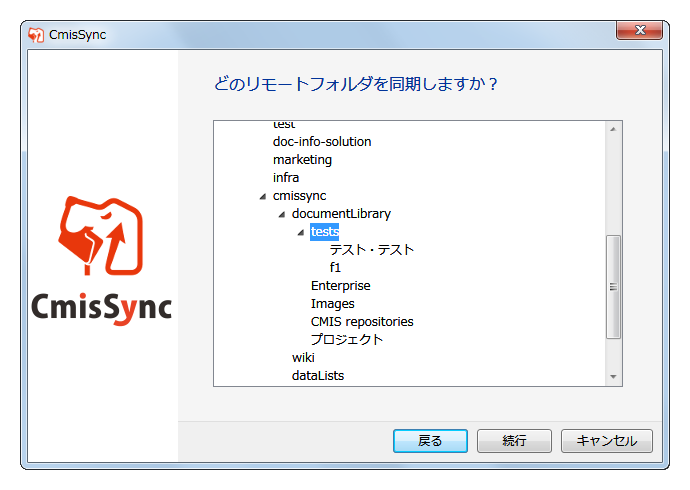
「次」を押すと、Alfrescoのフォルダのリストが表示されます。
同期したいフォルダを選択してください。
とくにAlfresco Share の場合は「Sites」をクリックして、同期したい Site を選び、その「documentLibrary」を選択してください。

 
設定はこれで終了です。
CmisSync はすぐに Alfresco とあなたのPCとの同期を開始します。
CmisSync はファイルの編集・追加を双方向で行えます。
もしもファイルの変更が衝突した場合、警告が表示されます。衝突した2つのファイルはバックアップされている為、後でマージすることも可能です。

CmisSyncはイージフが開発しているオープンソース製品です。
Alfrescoだけではなく、NuxeoやIBM FileNetやSharePointなど、CMIS準拠のリポジトリならなんでも同期できます。

Wednesday, January 23, 2013

Wikivoyage Offline: Travel guide for Android

I just released Wikivoyage Offline, an Android application that contains guide books for 27,000 destinations.

Instead of carrying a heavy guidebook that shouts "I am a tourist", just use your phone!

Content is downloaded to the phone's SD card, so you can use it offline (useful in case of no Internet or expensive roaming).
The whole world is a 80MB download.

Content is updated every two weeks, from Wikivoyage, the "Wikipedia for tourism information", which graduated from beta last week.

The app is free and open source.

Thursday, November 22, 2012

Employees use Dropbox? They will love CmisSync, and IT will benefit

How do you access your company's shared documents?
If your company has an ECM server, chances are you access documents either:
1) Via a web interface
2) As a shared drive

Now there is a third approach: CmisSync synchronizes your company's documents to your personal computer.

Advantage over a web interface:
- They are just normal files on your hard drive. No need to open a browser and download a copy.
- Documents downloaded from a Web interface quickly become outdated. With CmisSync, the files on your hard drive are always up-to-date.

Advantage over a shared drive:
- Slow network does not slow you down.
- Continue using your files even when out of the office, or even in the plane or subway.

The user interface of CmisSync will feel very familiar to Dropbox users.
But instead of having a Dropbox Inc.'s servers stores the files of each user, all of your content is securely stored on your company's ECM server.

(Liferay users can also use Liferay Sync)

Wednesday, August 8, 2012

Aegif publie un système de gestion de contenu révolutionnaire: NemakiWare 1.0

TOKYO – Aujourd'hui Aegif a publié NemakiWare 1.0, un système de gestion de contenu dont le but est de battre tous les records en termes de scalabilité.

NemakiWare repose sur CouchDB, une base de données distribuée de type NoSQL.
C'est un changement radical par rapport aux autres systèmes de gestion de contenu, qui utilisent des bases de données traditionnelles comme Oracle ou MySQL.

Les points forts de NemakiWare sont la scalabilité et l'extensibilité.

Aegif a toujours été très proactif sur CMIS, publiant le premier explorateur CMIS orienté intégration, seulement quelques semaines après la parution du standard CMIS.

NemakiWare est Open Source, et est disponible gratuitement sur http://nemakiware.bitbucket.org

À propos d'Aegif


Aegif est une société de conseil japonaise, spécialiste de la gestion documentaire open source. Sa vaste expérience lui permet de minimiser les risques et catalyser le potentiel des solutions entreprise open-source, afin de proposer des solutions optimales, principalement dans des environnements à grande échelle. De la définition des exigences à la conception, Aegif accompagne ses clients en avance de pahse et jusqu'à la livraison de solutions performantes, efficaces et flexibles. Voir www.aegif.jp

À propos de CMIS

CMIS (Content Management Interoperability Services) est un standard pour l'interopérabilité entre les divers systèmes de gestion de contenu du marché. CMIS a été approuvé par le consortium OASIS (Organization for the Advancement of Structured Information Standards) en mai 2010. Tous les principaux vendeurs supportent CMIS:  Adobe, Alfresco, EMC, eXo, FatWire, HP, IBM, ISIS Papyrus, Liferay, Microsoft, Nuxeo, Open Text, Oracle, SAP et autres.

Contact

Aegif Corporation
Nicolas Raoul
nicolas.raoul@aegif.jp

Aegif releases revolutionary ECM server: NemakiWare 1.0

TOKYO – Today Aegif released NemakiWare 1.0, an ECM (Enterprise Content Management) server that aims to redefine ECM scalability.

NemakiWare uses CouchDB, a NoSQL distributed database.
That is a radical shift from existing ECM servers, which are using traditional database engines like Oracle or MySQL.

The strengths of NemakiWare are scalability and extensibility.

NemakiWare was designed with the open standard CMIS in mind, making it an ECMS of choice when interoperability is needed. Aegif has always been very proactive on CMIS, releasing the first integration-oriented CMIS webapp only a few weeks after the CMIS standard was approved.

NemakiWare is Open Source, and can be downloaded for free at http://nemakiware.bitbucket.org

About Aegif


Aegif is a leading consulting firm in Japan, with a strong focus on open-source ECM consulting. Its extensive experience allows it to minimize risks while leveraging the potential of enterprise-class open-source software, to offer optimal solutions to clients, typically in large-scale environments. From requirements analysis to solution design, Aegif accompanies its clients from early phases until the delivery of a powerful, efficient and flexible solution. See www.aegif.jp

About CMIS

CMIS (Content Management Interoperability Services) is a standard for interoperability between Enterprise Content Management products. CMIS has been approved by the OASIS consortium (Organization for the Advancement of Structured Information Standards) in May 2010. All major ECM players support CMIS:  Adobe, Alfresco, EMC, eXo, FatWire, HP, IBM, ISIS Papyrus, Liferay, Microsoft, Nuxeo, Open Text, Oracle, SAP and more.

Contact

Aegif Corporation
Nicolas Raoul
nicolas.raoul@aegif.jp

Wednesday, July 11, 2012

Activitiワークフロー:チュートリアル(パート1)

最近リリースされたAlfresco 4には新しいワークフローエンジンが入っています。「Activiti」というエンジンです。
ActivitiはAlfrescoとは独立したプロジェクトなので、他のアプリケーションと使えます。例えばLiferayでActivitiを使えます。Activitiは独立プロジェクトと言っても、実際にはAlfresco社がスポンサーとなっています。

jBPMと同じく、ActivitiはBPMN言語で書かれたビジネスプロセスを使用できます。
今週のブログポストのパート1では、一番簡単なActivitiワークフローを作る方法を説明します。

まずは、Eclipse Classicバージョン3.7(または3.7以上)をインストールしてください:http://www.eclipse.org/downloads/

そして、Eclipseの中にActivitiプラグインをインストールしてください:
・Eclipseを実行
・「ヘルプ」 → 「新規ソフトウェアのインストール」をクリック
・「追加」をクリック
・「名前」と「ロケーション」のところに、「Activiti BPMN 2.0 designer」と「http://activiti.org/designer/update/」を入力(下記の図通り)
・OKをクリックして、少し待つ
・「Activiti BPMN Designer」にチェックを付ける
・「次へ」をクリック
・依存解析を待つ
・「次へ」をクリック
・ライセンスを了承
・「完了」をクリック
・インストールが行われる
・Eclipseを再起動


では、Alfrescoでこのビジネスプロセスを使ってみましょう:
・Eclipseで、「ファイル」 → 「新規」 → 「その他」 → 「Activiti」 → 「Activiti Project」をクリック
・「次へ」をクリック
・「プロジェクト名」のところに、「nico1」を入力
・「完了」をクリック
・プロジェクトの構成が作成されました。「nico1/src/main/resources/diagrams」フォルダーを開く
・「diagrams」に右クリック、「新規」 → 「その他」 → 「Activiti」 → 「Activiti Diagram」
・「ファイル名」のところに「process1」を入力
・「次へ」をクリック
・「Yes, use a template」と「Pooled Review And Approve Activiti Process」を選択
・「完了」をクリック

4つのノードの図が表示されます。ビジネスプロセスの図です。
図の余白にクリックし、下の「プロパティー」→「処理」→「Id」のところに、「activitiReviewPooled」代わりに「process1」を入力。


これから、Alfrescoでこのビジネスプロセスを使いましょう:
・Alfresco Community 4.0d(またはそれ以上)をインストール
・「Alfresco/tomcat/shared/classes/alfresco/extension」というフォルダーを開く
・その中に、「workflows」という新しいフォルダーを作成
・この「workflows」フォルダーの中に、上記のステップで作成された「process1.bpmn」というファイルをコピー
・「Alfresco/tomcat/shared/classes/alfresco/extension」というフォルダーの中に、「activiti-adhoc-timer-workflow-context.xml.sample」というファイルを「nico1-workflow-context.xml」としてコピー
・この「nico1-workflow-context.xml」を下記のように編集:


                                        activiti
                                        alfresco/extension/workflows/process1.bpmn
                                        text/xml
                                        false


                alfresco.messages.nicoWorkflow


「alfresco.messages.nicoWorkflow」の部分はラベルについてです。「Alfresco/tomcat/shared/classes/alfresco/messages」というフォルダーの中に、下記の内容で「nicoWorkflow.properties」というファイルを作成。

process1.workflow.title=Process 1
process1.workflow.description=Based on pooled review

Alfrescoを再起動

ブラウザで「http://127.0.0.1:8080/share」を開いて、ログイン。
「http://localhost:8080/share/page/start-workflow」を開く。
ワークフローのリストの中に、「Process 1」が表示されています。
Alfrescoにデフォルトで登録されている「pooled
review」と同じように使用できます。

今回は、一番簡単なActivitiワークフローを作る方法を説明しました。
パート2では実践的な説明をする予定です。
Alfrescoを使わない場合は、スタンドアローンActivitiのインストールガイドをご覧ください。
Nicolas Raoul

Friday, June 29, 2012

Ubuntu LinuxでEclipse日本語化

1.EclipseのZIPをダンロード:http://www.eclipse.org/downloads/
2.ユーザホームでZIPを展開
3.Pleiadesをダウンロード:http://mergedoc.sourceforge.jp/
4.Eclipseの「dropins」というフォルダーの中に「pleiades」というフォルダーを作成し、そのpleiadesフォルダーの中にPleiadesを展開
5.Eclipseの「eclipse.ini」というファイルをテキストエディタで開いて、最後に下記の一行を追加:

-javaagent:/home/yamada/p/eclipse/dropins/pleiades/plugins/jp.sourceforge.mergedoc.pleiades/pleiades.jar

(yamadaの代わりに、自分のユーザ名を入力)

6.Eclipseを起動。メニューなどが日本語で表示されます!

フォルダー構成一覧:
/home
 /yamada
  /eclipse
    eclipse.ini
    eclipse
    /dropins
     /pleiades
      /features
      /plugins
      ...
    ...
   ...
  ...
ニコラ・ラウル

Friday, May 18, 2012

Identifying biased Wikipedia articles... without looking at their content!

Data is often worthless without metadata.
But sometimes metadata is even more useful than data!

I created ASE, a tool to spot unnoticed biased and low-quality Wikipedia articles.
To assess articles, ASE does not even need to look at the data!
ASE just looks at the metadata, especially article history.

Context: To see how Wikipedia articles look like, check Special:Random many times. As you can see, 99.9% of Wikipedia articles are either good or have been tagged as needing references, copyedit, or other particular attention (banners at the top of articles).

ASE's goal is to spot the remaining 0.1%, which means articles that:

  • Are biased , or not of good quality (less than C on the article quality scale).
  • Have not been already tagged as needing references, copyedit, or any other.
How does ASE do this without even looking at the article?

ASE's axiom is that article quality increases with participation.
Articles that have been written by only a single editor, have a higher probability of being biased and of lower quality.
So basically the strategy is to spot articles that have been written by one editor.
Bots are filtered out, because they can not really be counted as participation.
Experience is also taken into account.

There are false positives, but accuracy is pretty good, and many Wikipedians have used ASE to spot and fix thousands of articles:

ASE is open source, of course.
If you feel like editing Wikipedia, have a look at the list of spotted articles and tips.
Good editing!
Nicolas Raoul
@nicolas_raoul

Wednesday, April 25, 2012

Alfresco: How to keep working even when offline?


Most people use Alfresco via their native file manager (Windows Explorer, Finder, Nautilus...) thanks to Alfresco's shared drive interface.
A shared drive is convenient, but what happens when your network connection disappears? The shared drive disappears. It is how shared drives are designed to work. No network, no shared drive.

What if you are in the plane, in an underground data center, or in the subway with no reliable network access?
One option is to checkout files you want to edit offline, but that is not a satisfying solution (duplication, out-of-date versions).

In those cases, you will need to use a synchronization client.
Hopefully, Alfresco offers interfaces for many protocols, so you have different options to choose from.

1) CmisSync

Very similar to the Dropbox client, lets you sync with any Alfresco content.
Free, Open Source.
.NET/Mono, Linux/Mac port not finished yet.

2) Alfresco Desktop Sync

Official Alfresco offline client. Let's you sync any Share Site or directory within a site.
Free.
Java, Linux/Mac/Windows.
Not to be confused with an older project that has the same name and comes up first on Google, hosted on addons.alfresco.com and SourceForge.

3) FTPbox

If you like DropBox, you will love FTPbox.
The user interface is the same, with tray icon and almost no configuration needed.
Forget about 2GB limits and the security risk associated with externally-hosted data: you now have an unlimited DropBox for free, and the files are straight from your smart Alfresco repository!

The bad news: FTPbox is not compatible with Mac/Linux.
The good news: FTPbox is open source, so porting to Mac/Linux is a matter of motivation.

4) OFS

UNIX users will know that FUSE allows to easily mount/unmount any kind of filesystem.
OFS (Offline FileSystem) allows you to maintain an offline copy of any remote filesystem.
It can take advantage of Alfresco's NFS interface.

Unfortunately, this solution is not usable on Windows until Windows allows userspace filesystems.

5) WebDAV Sync

WebDAV Sync is a command-line tool that can synchronize documents using Alfresco's WebDAV interface.
Programmers love command-line tools, but it is not for office users...
WebDAV Sync is portable (Java) and open source, so it is a great choice for integration with existing client-side software (for instance if your company has a custom VoIP/chat/PIM app)

Conclusion

I was hoping that version 3 of Adobe Drive (which supports CMIS) would offer an option to cache documents for offline use, but unfortunately it does not.

For now, CmisSync and Alfresco Desktop Sync are by far the most usable.
Nicolas Raoul

Wednesday, April 11, 2012

オフライン共同電子旅行ガイドブックOxygenGuide知っていますか?


「君は明日からヨーロッパ10ヶ国に出張!」と言われれば、旅行ガイドブック10冊買いに飛び出しますか?

旅行ガイドブックには便利な情報が乗っていますが、いくつかの問題があります:
  • 重い。荷物の重さチェックの時も、旅行中に出歩くときに、邪魔です。
  • 店で売ってる本の内容は去年や一昨年のもので、古い情報です。Wikipediaように最新情報が欲しいです。それに、毎年新しいバージョンを買えば、結構お金が掛かります。
  • 本の内容より、たくさんの人が参加しているコミュニティで書かれたものの方が良い。よく知らない会社が決めたお勧めリストより、食べログなどが頼もしいでしょう。
Wikitravelなど、ウェブサイトはあるけど、海外でのローミング料はすごく高いし、飛行機や砂漠で接続できません。

というわけで、OxygenGuideというオフラインWikitravelガイドブックプロジェクトを作りました。
スマートフォンやタブレットやラップトップで使えます。
テキストだけなので、26万ヶ所のページがあっても、436メガバイトしか掛かりません。

興味があれば、ダウンロードして、スマートフォンにコピーして、使ってみて下さい!
無料です。
そして、次のタスクをやっていただける方を募集中です:
  • 一定の間隔でWikitravelダンプスクリプトの実行
  • 新しい形式でのエキスポート機能の開発(特に電子ブック)
  • wikicode→HTML変換エンジンの改善
  • 英語版Wikitravelだけではなく、日本語版WikitravelもOxygenGuide化
  • もちろん、Wikitravelも皆の編集を待ってます!
Nicolas Raoul
nicolas.raoul@aegif.jp

Tuesday, April 3, 2012

新しいオープンソースフォント選択ライブラリAntisquareリリース


アプリで「ͿͿͿͿͿ」のような文字化けを見たことがありますか?


これは、表示するべきだった文字列が、開発者やシステムが選んだフォントファイルにありません、ということです。「トーフ型の文字化け」、または「豆腐化け」や「豆腐化」とたまに言われてます。普通の文字化けと違って、文字コードの問題ではなく、フォント選択の問題です。

あなたのパソコンでも、こういう問題が起こるはずです。例えば、このページはちゃんと表示されていますか?(ビルマ語、ミャンマー、話者4千万人以上)

OSによってはフォント・フォールバックという仕組みを使える場合がありますが、アンドロイドの場合などは埋め込まれたフォントを使うとフォント・フォールバックできません。

例えば、フォントが「TibetanDDC.ttf」なら、アラビア語は表示されません。開発者は「誰もアラビア語のコンテンツを読まないだろう!」と考えたかもしれませんが、そうとは限りませんよ。

というわけで、最適なフォントを選んでくれるライブラリ「Antisquare」を作りました。

呼び出し例:Antisquare.getSuitableFonts('ណ')
戻り値:"KhmerOS.ttf"

速いです(1ミリ秒の間に2万回も呼ぶことができるほどです)。
Javaで作りました。
オープンソースにしたので、是非使ってみてください!
Nicolas Raoul

Tuesday, March 6, 2012

Androidのオープンソースマーケット F-Droid を知っていますか?


Androidにはものすごく沢山のアプリがあって、探すとき色々なことを調べる必要があります:
  • 品質
  • パーミッション
  • マルウェア、スパイウェア、トラックウェア、アドウェア
  • 値段
オープンソースソフトウェアは以上の点に強いです。特に、マルウェアがないです。
オープンソースアプリの中に悪意のあるコードがあれば、誰かが見つけます。「誰もコードなんて読まない」とたまに言われてますが、実際にコードを読む人達はいますよ!「F-Droid」の人達です。

F-Droidというのはアプリマーケットです。このマーケットには、オープンソースのアプリだけが登録されています。
コードはちゃんと調査されており、広告もユーザトラッキングも禁止されています。F-Droidには優しいアプリしか登録されていません。
もちろん、全部無料です。

このように基準が厳しくても、F-Droidにはたくさんのアプリが登録されていますので、Androidを使っている皆さん、是非F-Droidを使ってみてください!


そして、F-Droidでは次のような人たちを募集中です!
  1. オープンソースアプリを探す人達:色々なところで探して、オープンソースアプリを見つけたらF-Droidに知らせる。
  2. ビルドの設定を書く人達:SVNやGitなどのレポジトリのURL、アプリのライセンスや名前などをテキストファイルで書いて、ビルドのテストをする。あまり難しくないなので、興味がある方は是非ご協力ください!
各アプリは一つの「レシピ」という簡単なファイルで定義されています:

Category:Multimedia
License:GPLv3
Summary: PDF reader
Description:
A reader for PDF files.
.
Repo Type:svn
Repo:http://vudroid.googlecode.com/svn/trunk/
Build Version:1.4,5,56

前半はメタデータ:カテゴリ、ライセンス、名前、記述。
後半はレポジトリとバージョン。例えば、上記のアプリの「1.4」バージョン(バージョン番号5)はSVNリビジョン56にある、という意味です。

こちらにわかりやすいサンプルがあります。詳しい説明もあります。F-Droidのサーバーはテキストファイルに書かれているとおりにソースコードリポジトリからチェックアウトし、ビルドまで自動的に行ってアプリを作り、配布します。
Nicolas Raoul
nicolas.raoul@aegif.jp